Конфигуратор
В зависимости от настроек, конфигуратор можно открыть с помощью вкладки в верхней части экрана или через сэндвич-меню.
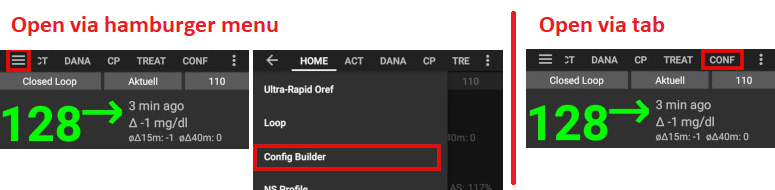
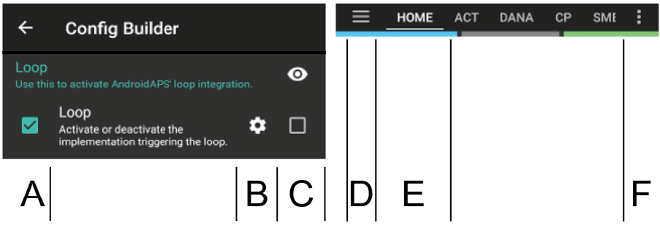
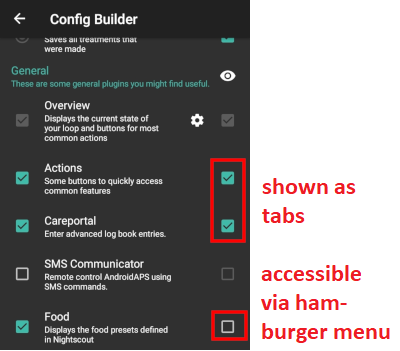
Конфигуратор (Конф) - это вкладка, на которой можно подключать и отключать модули программы. Ячейки с левой стороны (A) позволяют выбрать, какими модулями программы вы будете пользоваться, ячейки справа (C) позволяют представить эти модули в виде вкладок (E) в AndroidAPS. Если правая ячейка не активирована, доступ к функциям можно получить из выпадающего меню (D) в левом верхнем углу экрана.
Там, где в пределах модуля доступны дополнительные параметры, можно нажать на шестеренку (B), которая их откроет.
Первая конфигурация: Начиная с версии 2.0 AAPS процесс настройки AndroidAPS контролируется Мастером установки. Для его запуска нажмите на меню под тремя точками в правом верхнем углу экрана меню (F) и выберите «Мастер установки».
Вкладка или сэндвич-меню
С помощью переключателя под значком глаза вы можете решить, как открыть соответствующий раздел программы.
Профиль
Выберите нужный базальной профиль См. страницу Профили для дополнительной информации.
Локальный профиль (рекомендуется)
Локальный профиль использует базальной профиль, введенный вручную в телефоне. Как только он выбран, появляется новая вкладка, где можно при необходимости изменить данные профиля, считываемые с помпы. При следующем переключении профиля они записываются на помпу в профиль 1. Мы рекомендуем этот профиль, поскольку он не зависит от интернет-соединения.
Ваши локальные профили являются частью экспортируемых настроек. Поэтому убедитесь, что у вас есть резервная копия в безопасном месте.
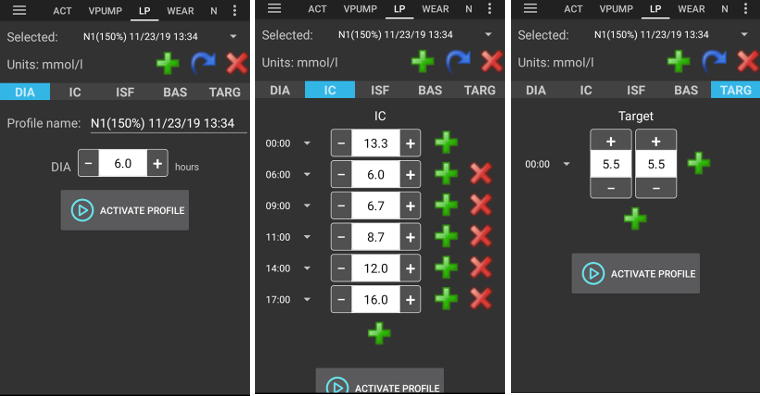
Кнопки:
- зеленый плюс: добавить
- красный крестик: удалить
- синяя стрелка: дублировать
Если вы вносите изменения в профиль, убедитесь, что редактируете правильный профиль. На вкладке профиля не всегда отображается фактически используемый профиль, например, если вы переключили профиль, используя вкладку профиля на домашней странице, то он может отличаться от профиля, который показан на вкладке, так как между ними нет синхронизации.
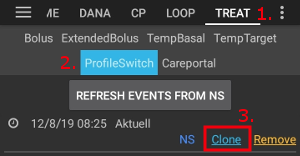
Переключение профиля и клонирование
Вы можете легко создать новый локальный профиль с помощью переключения профиля. В этом случае сдвиг по времени и процент будет применяться к новому локальному профилю.
- Перейдите на вкладку терапии.
- Выберите Переключатель профилей.
- Нажмите Кнопку “Клонировать”.
- Вы можете редактировать новый локальный профиль через вкладку локальный профиль (ЛП) или через сэндвич-меню.
Если вы хотите переключаться с профиля Nightscout на локальный профиль просто сделайте переключение профиля в профиле NS и клонируйте его, как описано выше.
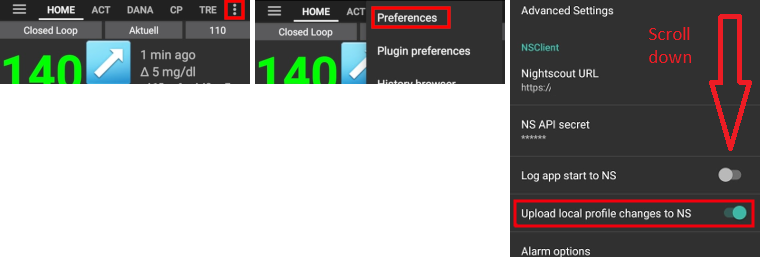
Загрузить локальные профили в Nightscout
Локальные профили также могут быть загружены на Nightscout. The settings can be found in NSClient preferences.
Преимущества:
- не требуется подключение к интернету для изменения настроек профиля
- изменения профиля могут быть сделаны непосредственно на телефоне
- новый профиль можно создать при помощи переключателя профиля
- локальные профили можно загрузить в Nightscout
Недостатки:
- отсутствуют
Profile helper
Profile helper offers two functions:
- Find a profile for kids
- Compare two profiles or profile switches in order to clone a new profile
Details are explained on the separate profile helper page.
NS Profile
NS Profile uses the profiles you have saved on your Nightscout site (https://[yournightscoutsiteaddress]/profile). You can use the Profile Switch to change which of those profiles is active, this writes the profile to the pump in case of AndroidAPS failure. This allows you to easily create multiple profiles in Nightscout (i.e.. work, home, sports, holidays, etc.). Shortly after clicking on “Save” they will be transferred to AAPS if your smartphone is online. Even without an Internet connection or without a connection to Nightscout, the Nightscout profiles are available in AAPS once they have been synchronized.
Do a profile switch to activate a profile from Nightscout. Press and hold the current profile in the AAPS homescreen at the top (grey field between the light blue “Open/Closed Loop” field and the dark blue target area field) > Profile switch > Select profile > OK. AAPS also writes the selected profile into the pump after the profile change, so that it is available without AAPS in an emergency and continues to run.
Преимущества:
- множественные профили
- легко редактировать с помощью ПК или планшета
Недостатки:
- невозможность локальных изменений в настройках профиля
- профиль не может быть изменен непосредственно на телефоне
Инсулин
Select the type of insulin curve you are using. The options ‘Rapid-Acting Oref’, Ultra-Rapid Oref’ and ‘Free-Peak Oref’ all have an exponential shape. More information is listed in the OpenAPS docs, the curves will vary based on the DIA and the time to peak.
The DIA is not the same for each person. That’s why you have to test it for yourself. But it must always be at least 5 hours. You can read more about that in the Insulin Profile section of this page.
For Rapid-Acting and Ultra-Rapid, the DIA is the only variable you can adjust by yourself, the time to peak is fixed. Free-Peak allows you to adjust both the DIA and the time to peak, and must only be used by advanced users who know the effects of these settings.
The insulin curve graph helps you to understand the different curves. You can view it by enabling the tickbox to show it as a tab, otherwise it will be in the hamburger menu.
Rapid-Acting Oref
- рекомендуется для Humalog, Novolog и Novorapid
- DIA (длительность действия инсулина) = по крайней мере 5.0 часов
- Макс. пик = 75 мин после инъекции (фиксированный, не регулируется)
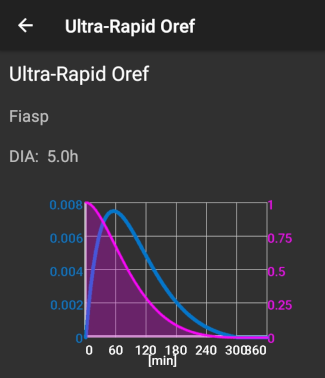
Ultra-Rapid Oref
- рекомендуется для FIASP
- DIA (длительность действия инсулина) = по крайней мере 5.0 часов
- Макс. пик = 55 мин после инъекции (фиксированный, не регулируется)
For a lot of people there is practically no noticeable effect of FIASP after 3-4 hours any more, even if 0.0xx units are available as a rule then. This residual amount can still be noticeable during sports, for example. Therefore, AndroidAPS uses minimum 5h as DIA.
Free Peak Oref
With the “Free Peak 0ref” profile you can individually enter the peak time. The DIA is automatically set to 5 hours if it is not specified higher in the profile.
This effect profile is recommended if an unbacked insulin or a mixture of different insulins is used.
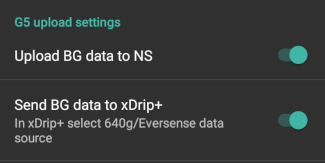
Источник данных гликемии
Select the blood glucose source you are using - see BG Source page for more setup information.
СК с клиента Nightscout
Glimp -поддерживается только версия 4.15.57 и более поздние
Модифицированное приложение Dexcom - выберите «Отправлять данные ГК на xDrip +», если хотите пользоваться оповещениями от xDrip +.
Tomato App for MiaoMiao device
Random BG: Generates random BG data (Demo mode only)
Помпа
Select the pump you are using.
- Dana R
- DanaR Корея (DanaR для корейского рынка)
- Dana Rv2 (DanaR pump with unofficial firmware upgrade)
- Dana RS
- Accu Chek Insight
- Accu Chek Combo (requires ruffy installation)
- Medtronic
- MDI (receive AAPS suggestions for your multiple daily injections therapy)
- Virtual pump (open loop for pump which don’t have any driver yet - AAPS suggestions only)
For dana pumps, use Advanced settings to activate BT watchdog if necessary. It switches off bluetooth for one second if no connection to the pump is possible. This may help on some phones where the bluetooth stack freezes.
Password for Dana RS pump must be entered correctly. Password was not checked in previous versions.
Определение чувствительности
Select the type of sensitivity detection. For more details of different designs please read on here. This will analyze historical data on the go and make adjustments if it recognizes that you are reacting more sensitively (or conversely, more resistant) to insulin than usual. More details about the Sensitivity algorithm can be read in the OpenAPS docs.
You can view your sensitivity on the homescreen by selecting SEN and watching the white line. Note, you need to be in Objective 8 in order to let Sensitivity Detection/Autosens automatically adjust the amount of insulin delivered. Before reaching that objective, the Autosens percentage / the line in your graph is displayed for information only.
Absorption settings
If you use Oref1 with SMB you must change min_5m_carbimpact to 8. The value is only used during gaps in CGM readings or when physical activity “uses up” all the blood glucose rise that would otherwise cause AAPS to decay COB. At times when carb absorption can’t be dynamically worked out based on your bloods reactions it inserts a default decay to your carbs. Basically, it is a failsafe.
Система ИПЖ
Select the desired APS algorithm for therapy adjustments. You can view the active detail of the chosen algorithm in the OpenAPS(OAPS) tab.
- OpenAPS AMA (advanced meal assist, state of the algorithm in 2017)More detail about OpenAPS AMA can be found in the OpenAPS docs. In simple terms the benefits are after you give yourself a meal bolus the system can high-temp more quickly IF you enter carbs reliably.
- OpenAPS SMB (super micro bolus, most recent algorithm for advanced users)Note you need to be in Objective 10 in order to use OpenAPS SMB and min_5m_carbimpact must be set to 8 in Config builder > Sensitivity detection > Sensitivity Oref1 settings.
Замкнутый цикл
- Switch between Open Loop, Closed Loop and Low Glucose Suspend (LGS).

Открытый цикл
- AAPS continuously evaluates all available data (IOB, COB, BG...) and makes treatment suggestions on how to adjust your therapy if necessary.
- The suggestions will not be executed automatically (as in closed loop) have to be entered manually into the pump or by using a button in case you are using a compatible pump (Dana R/RS or Accu Chek Combo).
- This option is for getting to know how AndroidAPS works or if you are using an unsupported pump.
Closed Loop/Замкнутый цикл (петля, контур)
- AAPS continuously evaluates all available data (IOB, COB, BG...) and automatically adjusts the treatment if necessary (i.e. without further intervention by you) to reach the set target range or value (bolus delivery, temporary basal rate, insulin switch-off to avoid hypo etc.).
- The Closed Loop works within numerous safety limits, which you can be set individually.
- Closed Loop is only possible if you are in Objective 6 or higher and use a supported pump.
- Please note: In closed loop mode a single target instead of target range (i.e. 5,5 mmol or 100 mg/dl instead of 5,0 - 7,0 mmol or 90 - 125 mg/dl) is recommended.
Low Glucose Suspend (LGS)
- maxIOB is set to zero
- This means if blood glucose is dropping it can reduce basal for you.
- But if blood glucose is rising no automatic correction will be made. Your basal rates will remain the same as your selected profile.
- Only if basal IOB is negative (from a previous Low Glucose Suspend) additional insulin will be given to lower BG.
Minimal request change
- При открытогм цикле вы будете получать уведомления каждый раз, когда AAPS рекомендует скорректировать базальную скорость.
- Чтобы уменьшить число уведомлений, можно либо использовать более широкий диапазон целевой ГК, либо увеличить процент минимального запроса на изменения.
- Он определяет относительное изменение, необходимое для активации уведомления.
Цели (обучающая программа)
AndroidAPS has a leraning program (objectives) that you have to fulfill step by step. This should guide you safely through setting up a closed loop system. It guarantees that you have set everything up correctly and understand what the system does exactly. This is the only way you can trust the system.
You should export your settings (including progress of the objectives) on a regularly basis. In case you have to replace your smartphone later (new purchase, display damage etc.) you can simply import those settings.
See Objectives page for more information.
Терапия
If you view the Treatments (Treat) tab, you can see the treatments that have been uploaded to nightscout. Should you wish to edit or delete an entry (e.g. you ate less carbs than you expected) then select ‘Remove’ and enter the new value (change the time if necessary) through the carbs button on the home screen.
Общие настройки
Общие замечания
Displays the current state of your loop and buttons for most common actions (see section The Homescreen for details). Settings can be accessed by clicking the cog wheel.
Не отключать экран
Option ‘Keep screen on’ will force Android to keep the screen on at all times. This is useful for presentations etc. But it consumes a lot of battery power. Therefore, it is recommended to connect the smartphone to a charger cable.
Кнопки
Define which Buttons are shown on the home screen.
- Терапия
- Калькулятор
- Инсулин
- Углеводы
- CGM (opens xDrip+)
- Калибровка
Furthermore, you can set shortcuts for insulin and carb increments and decide whether the notes field should be shown in treatment dialogues.
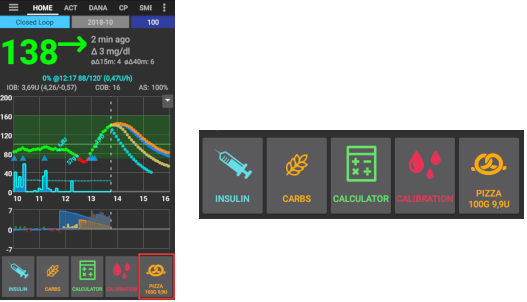
Настройки мастера болюса
Create a button for a certain standard meal (carbs and calculation method for the bolus) which will be displayed on the home screen. Use for standard meals frequently eaten. If different times are specified for the different meals you will always have the appropriate standard meal button on the home screen, depending on the time of day.
Note: Button will not be visible if outside the specified time range or if you have enough IOB to cover the carbs defined in the QuickWizard button.
Default Temp-Targets
Choose default temp-targets (duration and target). Preset values are:
- eating soon: target 72 mg/dl / 4.0 mmol/l, duration 45 min
- activity: target 140 mg/dl / 7.8 mmol/l, duration 90 min
- hypo: target 125 mg/dl / 6.9 mmol/l, duration 45 min
Fill/Prime standard insulin amounts
Choose the default amounts of the three buttons in fill/prime dialogue, depending on the length of your catheter.
Range of visualization
Choose the high and low marks for the BG-graph on AndroidAPS overview and smart watch. It is only the visualization, not the target range for your BG. Example: 70 - 180 mg/dl or 3.9 - 10 mmol/l
Shorten tab titles
Choose wether the tab titles in AndroidAPS are long (e.g. ACTIONS, LOCAL PROFILE, AUTOMATION) or short (e.g. ACT, LP, AUTO)
Show notes field in treatment dialogs
Choose if you want to have a notes field when entering treatments or not.
Индикаторы состояния
Choose if you want to have status lights on overview for canula age, insulin age, sensor age, battery age, reservoir level or battery level. When warning level is reached, the color of the status light will switch to yellow. Critical age will show up in red.
Advanced settings
Deliver this part of bolus wizard result: When using SMB, many people do not meal-bolus 100% of needed insulin, but only a part of it (e.g. 75 %) and let the SMB with UAM (unattended meal detection) do the rest. In this setting, you can choose a default value for the percenteage the bolus wizard should calculate with. If this setting is 75 % and you had to bolus 10u, the bolus wizard will propose a meal bolus of only 7.5 units.
Enable super bolus functionality in wizard (It is different from super micro bolus!): Use with caution and do not enable until you learn what it really does. Basically, the basal for the next two hours is added to the bolus and a two hour zero-temp activated. AAPS looping functions will be disabled - so use with care! If you use SMB AAPS looping functions will be disabled according to your settings in “Max minutes of basal to limit SMB to”, if you do not use SMB looping functions will be disabled for two hours. Details on super bolus can be found here.
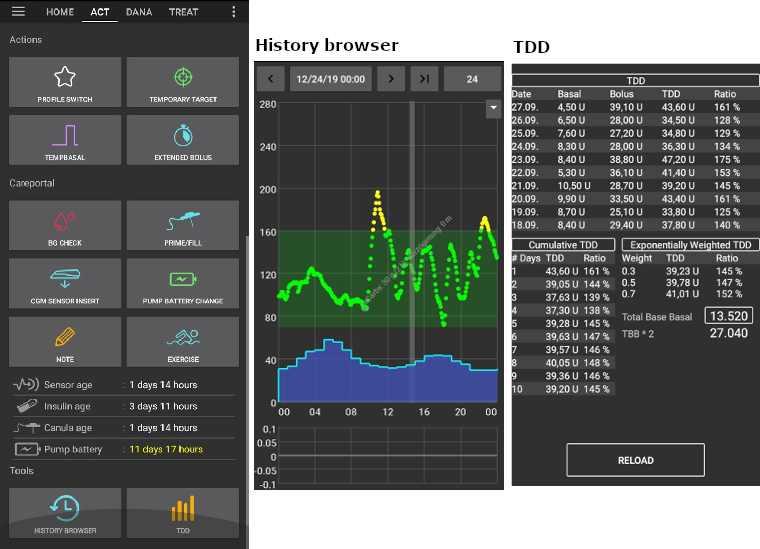
Действия
Some buttons to quickly access common features:
- Profiles Switch (see Profiles page for more setup information)
- Temporary targets
- Set / cancel temp. скорость базала
- Extended bolus (DanaR/RS or Combo pump only)
- Record for any specific care entries
- BG check
- Prime / fill - record pump site change and prime (if not done on pump)
- CGM sensor insert
- Pump battery change
- Note
- Exercise
- View the current sensor, insulin, canula and pump battery ages
- History browser
- TDD (Total daily dose = bolus + basal per day)
Some doctors use - especially for new pumpers - a basal-bolus-ratio of 50:50. Therefore ratio is calculated as TDD / 2 * TBB (Total base basal = sum of basal rate within 24 hours). Others prefer range of 32% to 37% of TDD for TBB. Like most of these rules-of-thumb it is of limited real validity. Note: Your diabetes may vary!
Автоматизация
User defined automation tasks (‘if-then-else’). Please read on here.
СМС-коммуникатор
Allows remote caregivers to control some AndroidAPS features via SMS, see SMS Commands for more setup information.
Food
Displays the food presets defined in the Nightscout food database, see Nightscout Readme for more setup information.
Note: Entries cannot be used in the AndroidAPS calculator. (View only)
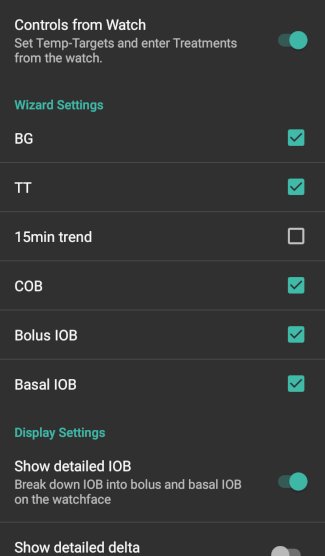
Wear
Monitor and control AAPS using your Android Wear watch (see page Watchfaces). Use settings (cog wheel) to define which variables should be considered when calculating bolus given though your watch (i.e. 15min trend, COB...).
Если вы хотите подавать болюс и т. д. с часов, тогда в настройках часов Wear следует включить «Управление с часов».
Through Wear tab or hamburger menu (top left of screen, if tab is not displayed) you can
- Resend all data. Might be helpful if watch was not connected for some time and you want to push the information to the watch.
- Open settings on your watch directly from your phone.
xDrip Statusline (watch)
Display loop information on your xDrip+ watchface (if you are not using AAPS/AAPSv2 watchface
NSClient
- Setup sync of your AndroidAPS data with Nightscout.
- Settings in preferences can be opened by clicking the cog wheel.
Тех. обслуживание
Email and number of logs to be send. Normally no change necessary.
Конфигуратор
Use tab for config builder instead of hamburger menu.